As one of the main sponsors of the new series Celebrity Masterchef, Woolworths approached me to develop a recipe for them using the secret ingredient for the week. Luckily for me (and you lot) the ingredient that was assigned to me was steak, which is right up my alley! You can check out more amazing steak recipes on their website over here.
This recipe might seem a bit long and feels as if it requires lots of effort, but it’s really easy to do. Just follow the steps, keep your cool and more importantly, enjoy the process! It’s totally worth it.

There are a great many recipes for cooking steak out there, and rightly so, we all have different opinions on what exactly makes the perfect steak. Personally the only rule I won’t budge on is never cooking it more than medium (that’s already pushing it, medium rare is preferred). Cooking a steak “well-done” is a sacrilegious offence and should result in your tong bearing rights being revoked indefinitely with your assignment to salad duty next time round.
Something to keep in mind is that no two steaks are the same. Even if you buy from the same butcher every time, the same cut of meat from different animals (and sometimes even from the same animal) will have differences in flavour and texture. The cooking process is also different: A thin 2cm sirloin steak needs high heat and fast cooking, while a 4cm thick piece of bone-in prime-rib needs medium heat and slower cooking.
I am a big fan of rib-eye steaks but they can be more difficult to get hold of. For this recipe I decided to stick to the more widely available sirloin in order to allow more of you to cook along, so no excuses OK?
When buying steak, it’s important to know what to look out for, as I think most people get it all wrong. The untrained eye will probably be drawn to the bright red piece of meat, with the pure white fat. Unfortunately that’s exactly the steak you should avoid. Bright red meat means it’s very fresh (as in recently slaughtered) and unlike fruit and veg, meat is at its best when its matured.
Most types of red meat, especially beef, should be matured. This means that it is aged for a certain amount of days in a controlled environment in order to enhance the flavour and make the meat more tender. Additionally, the maturation process results in the meat losing that bright red colour and turning a more pale, almost brown shade. Now even though this might look slightly less appealing if you don’t know any better, believe me when I say the difference in taste and texture will be night and day. So ignore what your eyes are telling you and go for the matured piece of meat, you’ll thank me later.
The fat on free range animals is also likely to be more yellow than the white fat you may be accustomed to. Similarly this is not a bad thing. Embrace the unknown I say. You may be pleasantly surprised!
Right. Enough talking. Let’s start cooking! Here are the ingredients you are going to need.
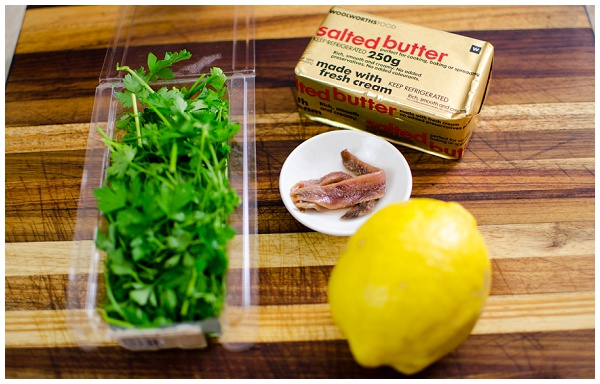
Ingredients:
For the Anchovy butter:
- 125 g salted butter
- Half a pack (about 15 g) fresh flat leaf parsley
- 4 anchovy fillets
- Zest of 1 lemon
For the Steak:
- 2 Thick cut, matured sirloin steaks, 300-350 g each
- 2 Tbsp coarse sea salt
- 2 tsp cracked black pepper
- 2 tsp ground coriander
- 2 tsp brown sugar
- 1 tsp instant coffee
- 1 tsp smoked paprika
- Enough firewood to build a respectable fire.
For the Asparagus:
- 170 g asparagus spears
- The juice of 1/2 a lemon (slice the other half in slices for garnish)
- 2 Tbsp olive oil
- salt & pepper
For the Honeyed Carrots:
- 240 g baby carrots (or cut normal carrots into smaller chunks)
- 125 g butter
- 3 Tbsp honey
- 2 sprigs of thyme (optional)
Method:
Let’s start with the Anchovy butter as that needs to set in the fridge a while before serving.
Ingredients for Anchovy butter
Divide a 250 g brick of salted butter in half, 125 g will be used now, and the rest we’ll use for the carrots later. Cut one of the 125 g blocks into smaller cubes, and let it come close to room temperature. You don’t want it to go completely soft, just soft enough for you to be able to squish it with a spoon. Place the cubes in a smallish mixing bowl.
Remove and discard the large stalks from the parsley. Chop up the leaves and add them to the bowl with the butter. Chop up the anchovy fillets just as they are, and add them to the bowl.
Zest the lemon using a Microplane, zester or a fine grater. Be careful not to remove with white part of the lemon as well, that pith stuff is bitter. Once you have all the ingredients in the bowl and the butter is soft enough, start mixing. Don’t overwork it too much: you want to make sure everything is mixed evenly.
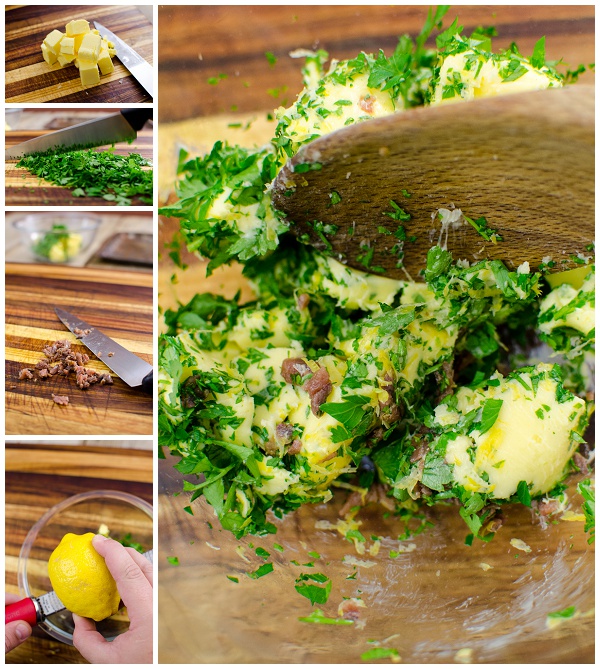
Prepping anchovy butter
Spoon the mixture onto some clingfilm and shape it roughly into a log. Fold over the cling film and form the log with your hands while pushing out any air bubbles from the cling film. Hold the edges of the cling film tight on both sides and roll the log forward. The log should tighten up and get nice and round. Keep rolling like that until it forms a nice even shaped log. Fold the edges you had in your hands underneath the log and place it in the fridge to set. You should aim to have something that looks like a butter sausage, see the image below.
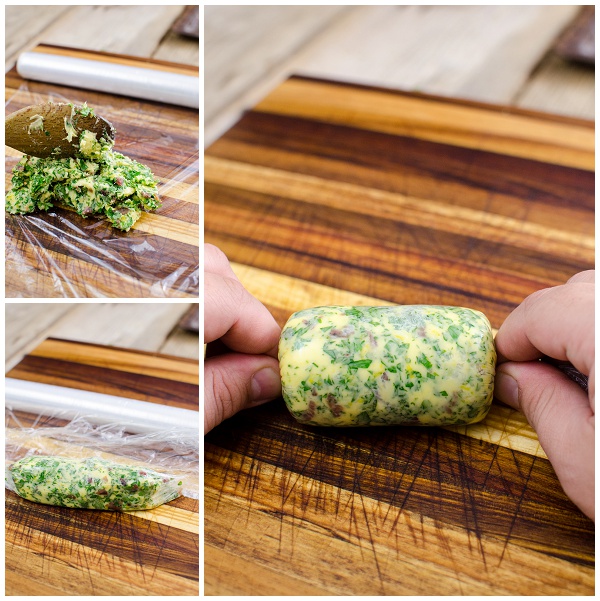
Rolling anchovy butter
Next up: build yourself a respectably sized fire. Light that sucker up and have a beer while monitoring the flames, just to be safe you know.
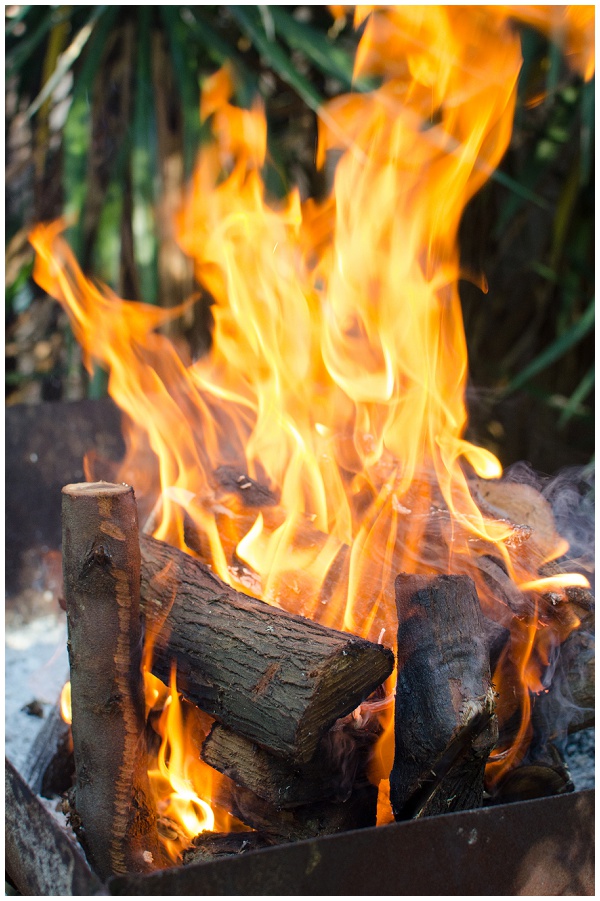
Braai fire
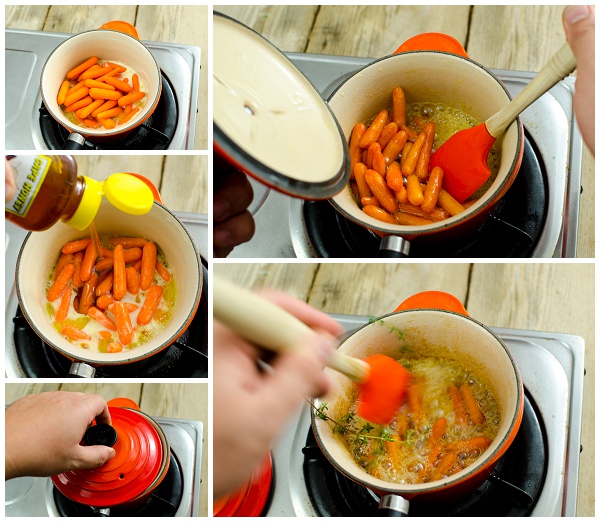
Right. Enough staring at the fire. Back in the kitchen with you. It’s time to tackle the carrots. This is fairly easy to do but you have to keep an eye on these babies as they can burn easily.
Melt 125 g of butter in a small saucepan and add the carrots. Cook them on a low simmer for between 10 to 15 minutes, depending on how you like them. Be careful, the butter might bubble over in the beginning but if this happens just remove the pan from the heat and stir for a few seconds. When placing the pan back on the heat, the butter will soon start behaving when most of the water is cooked off.
After 5 minutes add the honey and stir well. You can partially cover the pot with a lid but you really need to keep your eye on these every few minutes and stir them through properly. With the added honey they can burn very easily. If you have a sprig or two of thyme on hand you can add them to the pot about 10 minutes into the cooking process.
You need to check when the carrots start to caramelise, mine took just under 15 minutes. Remove them from the pan as soon as they do because a minute more in there and they will start to burn. Even if you leave them in the pot and remove them from heat, the residual heat in the pot will still overcook them: so pop them in a serving dish immediately to allow them to cool down.
Making the honeyed carrots
Hopefully you’ll end up with something resembling this. I like mine well caramelised but you can remove them sooner if you prefer a little crunch.
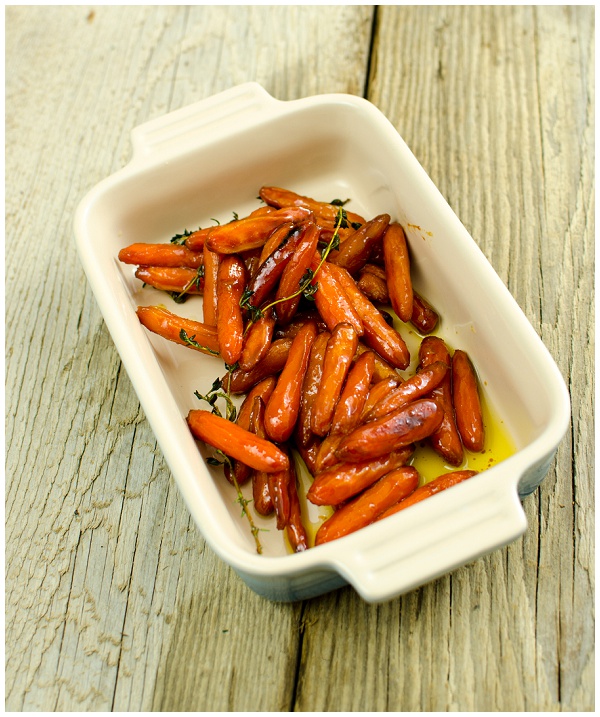
Honeyed baby carrots
To prepare the asparagus you need to remove the woody bits at the bottom of the stem. To do this, simply bend the stem near the bottom, it will snap at the right spot automatically like magic. Dress the asparagus with olive oil and lemon juice. Season with salt and pepper.
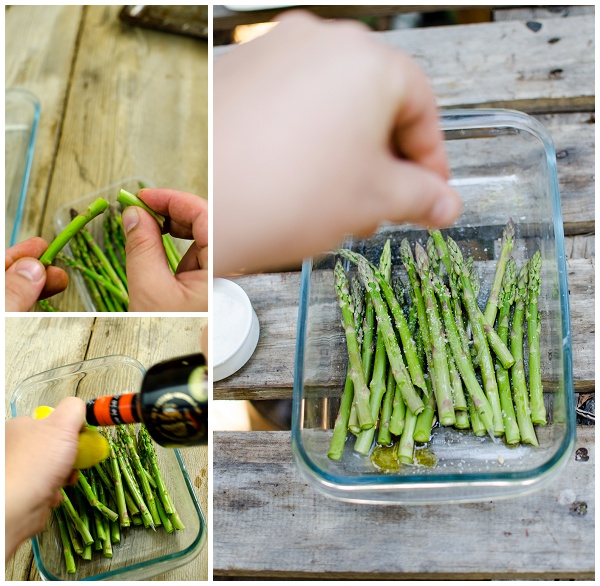
Prepping the asparagus
Ok cool, time to get to the star of the show: the steaks. First off, when you remove them from the packaging, there is bound to be some blood and moisture on the surface of the steaks. Dry that off with a clean cloth or some kitchen towel as the moisture will inhibit the browning process on the braai. We definitely don’t want that. Take your time and dry them properly on all sides as well as the plate they are on.
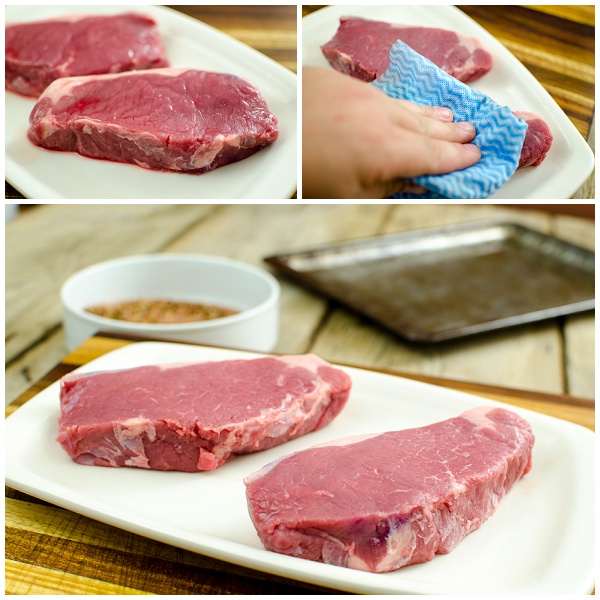
Drying the steak
Mix all the dry ingredients for the rub together with a fork, and that’s that. Yes, this is the simplest part of this recipe :P

Mixing the spice rub
When your coals are ready, it’s time to season the steaks with your fancy home-made dry rub. Do this just before you put the steaks on the braai, otherwise the salt will draw moisture to the surface of the steak. As discussed above, we don’t want any of that! Make sure you season the fatty edge, as well as the other one. Leave no part of the steak unseasoned.
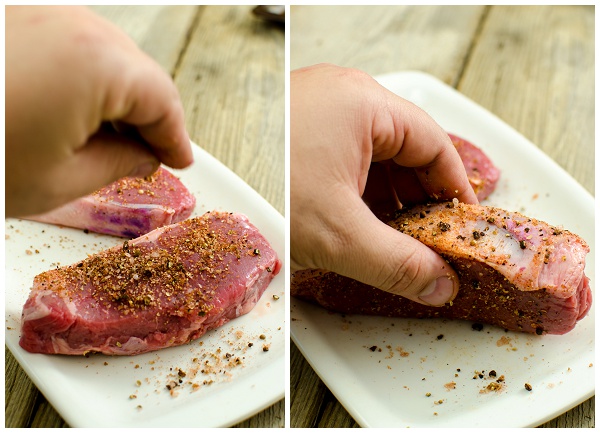
Seasoning the steak
The exact cooking time for steak depends on too many variables to fully explain in this post. It’s something you learn with experience but here is what I did with these babies. First, I cooked them for 2 minutes on each of the flat sides, turning every minute. So that’s 4 minutes total for the flat sides. The idea here is to avoid putting on too much colour too fast or you may burn the steak before it is cooked inside and that’s not ideal.
Remember to cook the edges as well, especially the fatty side as you want to get the fat crispy and rendered out a bit. Raw fat does not make for good eating. Use the tongs to make the steaks stand up on the edges if need be. 1 minute on each of the edges should be fine.
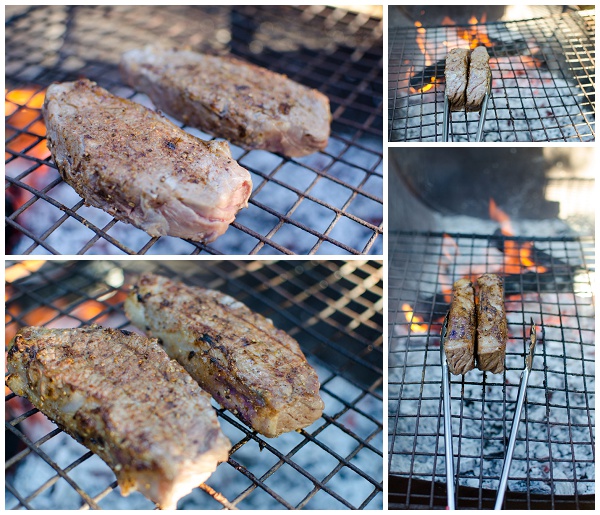
Braaing steak on all sides
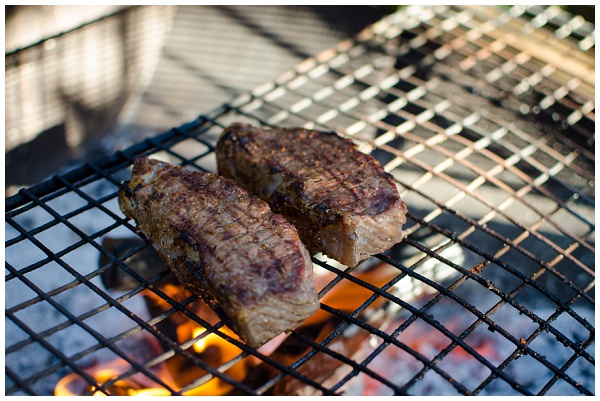
Lastly, to get more colour on the steaks (colour = flavour) I put the steaks right over the flames for a minute on each flat side. Here’s what they looked like at that stage. Remove them from the heat, and cover loosely with some tin foil, to let them rest while we braai the asparagus.
Steak on the braai
To braai the asparagus really takes just 2-3 minutes in the flames. It can be a tricky as you may lose a spear or two through the grid but you have to crack a few eggs to make an omelette, right? The trick is not to try and lift them up to turn them like you would a steak, but rather just gently roll them around on the grid with the tongs. You’ll get the hang of it soon enough.
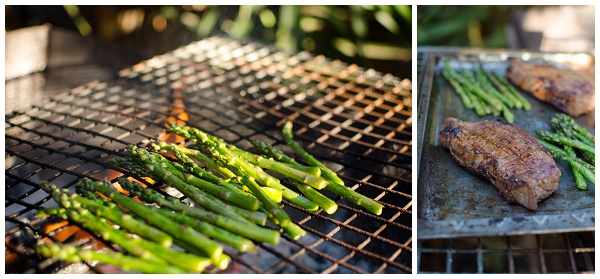
Braaing Asparagus
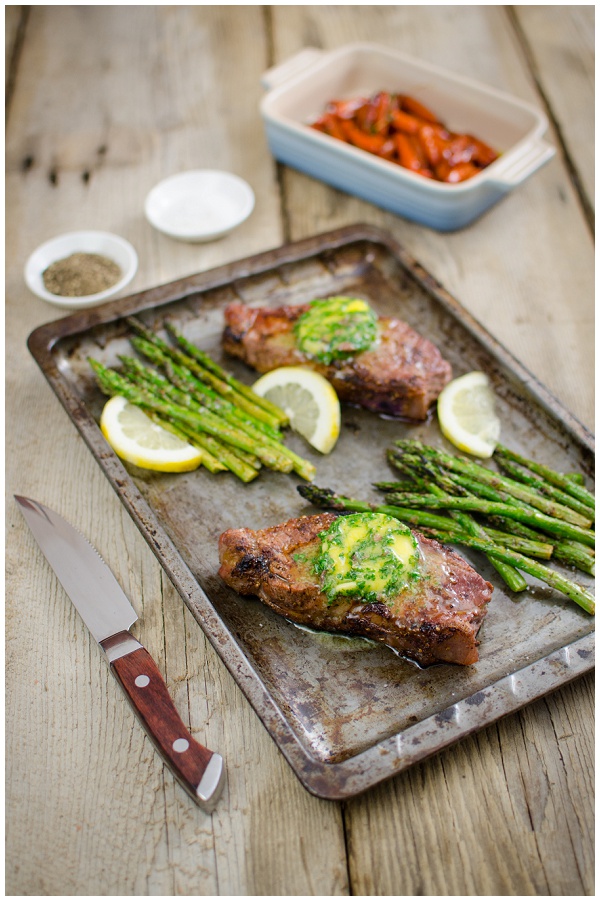
Remove the butter log from the cling film and cut about 1cm slices from it and pop these on the steaks. Watch them melt slowly into deliciousness. Squeeze some lemon juice over the asparagus and you are ready to go, dig in!
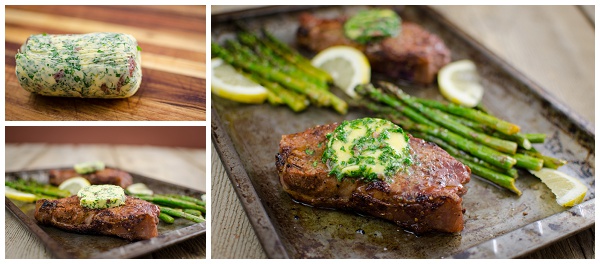
Slicing the butter
I really hope you try this recipe out. It is friggen delicious. If you think you are not a fan of anchovies, I urge you to try it hidden in the butter like this, it may just blow your mind!
Go on, dig in


Wow, those steaks look seriously tender. Looks like you had loads of fun, great pics!!
Thanks Anina!