It’s finally here, the long-overdue second installment of my “Learn from the Pros” series. I’m proud to present to you our next professional chef, esteemed Cape Town chef, Masterchef SA judge and self proclaimed Food Alchemist, Pete Goffe-Wood!
Pete certainly needs no introduction in South Africa these days. After Masterchef South Africa came to town, I think it’s safe to assume that most South Africans have seen his ugly manly mug by now. To learn more about the man’s life prior to Masterchef, check out his Chef’s Profile.
The idea with this series is that I go and spend some time with a professional chef in his/her kitchen. With any luck I’ll learn some tips, techniques and tricks of the trade which I will then share with you guys, my loyal readers.
Pete is passionate about sustainability when it comes to seafood, and is an ambassador of The South African Sustainable Seafood Initiative (SASSI). He decided to show us two dishes using fresh Yellowtail.
The first dish is Yellowtail with pan fried Asparagus and Fingerling Potatoes, served with a Roasted Garlic and Parsley dressing. The second is Yellowtail with Broccoli and Fingerling Potatoes, served with a Chilli and Anchovy Dressing.

Buying fresh fish:
Pete started off by giving us some pointers on buying fresh fish. Any dish will only be as good as the ingredients that you put into it, so it helps to know how to get the good stuff.
- The eye should be nice and shiny, not dull and glazed over.
- The flesh should be firm to the touch.
- The gills should be a nice lively purple or red colour, as opposed to a sort of dull brown.
- It shouldn’t smell of fish, almost have no smell at all. If anything, the fish should smell of the sea. (The open sea that is, not the discarded bait, baked in the sun kind of smell you get at the slipway.)
- The colour of the fish itself should be bright and lively. Not dull grey and oxidised.

Cleaning the fish:
The fish we had has already been scaled and gutted. You can ask your fishmonger to do this for you.
If you do not have the luxury of a fishmonger to do the dirty work for you, you’ll have to jump in yourself. This can get messy so I suggest taking this job outside.
To scale the fish, hold it by the tail and run the back of a butter knife (or more specialised tools, found at fishing/sports shops) up the side of the fish to it’s head. You should see scales flying all over the place. Take your time and get all of them off, the last thing you want is You might want to rinse it off under some running water from time to time.
To gut the fish, cut open the belly from it’s erm “exhaust” up towards the head and simply pull out all the innards. It’s not pretty, but it has to get done.
How to fillet a fish:
A sharp knife is of huge importance here. If you don’t know how how to sharpen your knife, get it done by a professional. It will make your life a whole lot easier, trust me.

- Dry the surface of the fish with a dishcloth, it will make it easier to get a good grip on it.
- Make a vertical cut behind the pectoral fin just behind the head. Go down until you feel the spine, but not all the way through.
- Angle your knife horizontally and run it down the spine all the way to the tail, holding the fish down with your other hand. You want to angle the blade so that it points slightly towards the spine, and not upwards into the fillet. You will probably screw this up the first few times, but stay calm and keep trying. With a little practice you will get the hang of it soon enough.
- Turn the fish over and do the same on the other side.
- If you want to remove the skin, it’s basically the same job, just start from the tail this time.
- Place the fillet skin side down on your cutting board and slice in as close to the skin as you can on the tail side.
- Focusing on angling your knife slightly towards the skin, run the knife up all the way through.
- Don’t do short rough strokes with the knife, this will lead to ragged edges on the fillet. Try using smooth, long, even strokes.

Removing pin bones:
- Run your fingers down the fillet and locate the pin bones, located along the spine. Pull these out with a pair pliers, be gentle but firm.
- Now you can trim the sides and cut the fish into the portions.
- Keep the head, carcass and trimmings to make fish stock or soup. You can freeze the carcass if you don’t plan on using it straight away.

Like I said, you will probably mess this up at first, but that’s the only way we learn. They may look like they just came out of a bar fight, but you should still have perfectly edible pieces of fish. Like most things in life, the more you do it the better you’ll become.
Preparing the vegetables:
Trying to do to many things at once is a recipe for disaster, so let’s get the vegetables and dressings out of the way so we can focus on cooking the fish.

Potatoes:
Both of the dishes we are doing today will be using fingerling potatoes, but baby potatoes will work just fine. To cook these cut them in half length wise and boil them in salted water until soft. You can test them by sticking a fork in one. If it goes in easy, and slides off the fork fairly easily when you lift it up, it’s cooked.
Asparagus:
Asparagus comes in different varieties, some thicker than others. Pete suggests that you peel the stalks of the thicker ones using a potato peeler as they can be a bit fibrous. You can generally use the thinner ones as is, just bend back and snap off the dry bottom end of the stalk.
A good way of cooking asparagus without overcooking it is by Blanching. Drop the asparagus spears in boiling salted water and cook until just tender, about 2-4 minutes. Remove the spears from the boiling water and immediately drop them in some ice water to cool down and stop the cooking process. Once cool remove the spears from the ice water, pat them dry and set aside.
This technique will help you avoid overcooking the vegetable and ending up with an overcooked, colourless piece of asparagus on the plate.
Broccoli:
Broccoli doesn’t need any fancy prepping, just cut it up into similar sized florets and blanch them using the same instructions as with the asparagus above.
Pete is using Tenderstem broccoli here, but if you can’t find that, any normal broccoli will work just fine. Again take care not to overcook, you still want some crunch and colour in there.
Preparing the dressings:
Pete generously gave us the recipes for the dressing used in both dishes, check them out below.
Chilli and Anchovy dressing:
Makes enough dressing to serve with 6 x 200gm portions of fish
- 1 Red Chilli
- 8 Anchovy Fillets
- 150ml Extra Virgin Olive Oil
- 1 cup Breadcrumbs
Method:
Finely chop the red chilli and roughly chop the anchovy fillets. Add both ingredients to a hot frying pan with a little of the olive oil.
Fry until the anchovies begin to spit and disintegrate. Remove the pan from the heat and add the rest of the olive oil, then add the breadcrumbs.
The dressing should resemble a thick paste.

Roasted Garlic and Parsley dressing:
Makes enough to serve with 10 x 200gm portions of fish. This dressing doesn’t keep very well in the fridge (starts to lose colour and vibrancy), so reduce the quantities below if you are cooking less fish. Pete also says that even though you could technically make this dressing with raw garlic, roasting the garlic first gives it a more mellowed flavour, and removes the acrid taste you sometimes get from raw garlic.
- 1 Large Head of Garlic
- 100gm Parsley, stalks and all
- 125ml Extra Virgin Olive Oil
- Juice of Two Lemons
- Sea Salt
- Freshly ground Black Pepper
Method:
Roast the head of garlic in a moderate oven (180°C) for approximately 20 minutes or until the garlic is completely soft.
Peel the individual cloves or squeeze them out. Mix the garlic puree, parley and lemon juice together with the olive oil.
Put the mixture into a blender or use a pestle and mortar to grind the mixture into a smooth dressing.

Tips for Cooking Fish:
When cooking fish, or meat for that matter, Pete suggests putting it in the pan with the presentation side down first. In other words, you want the side that will be facing upwards in the end, to hit the pan first. This is because you want maximum, even colour on that side, and the meat will curl and shrink somewhat as it cooks, making it difficult to get even colour on the side that is cooked second.
Overcooked fish can become dry very easily, so being able to gauge it’s level of “doneness” is important. Pete gave me this neat tip which I have tried out a number of times since then and it works great, every single time.
When you flip over the fish, let the top cool for a few seconds then gently feel the thickest part of the fish with your fingers. At first you will feel nothing out of the ordinary, but after 2 minutes or so, depending on the thickness of the fish, you will start feeling a slight vibration inside the fish. This is caused by the internal juices of the fish that has heated up sufficiently to start bubbling.
This basically means that the inside is warmed through and the fish is now cooked. From there on it is simply a matter of how cooked you like your fish. Personally I get it out of the pan the moment I can feel those “good vibrations” .
Some more tips from Pete:
- Use a cast iron or stainless steel pan with a heavy or reinforced base. These pans retain heat well as well as disperse it more evenly.
- Cook fish over a medium heat unless you are using salmon or tuna where you are after a charring effect like when cooking a steak.
- Always make sure your pan is at the desired heat before you put the fish in and once the fish is in the pan resist the temptation to keep turning it.
- When cooking thinner fillets like Angelfish for example its worth cooking the fillets on one side for 90% of the time to get a nice crust and then flip the fish over briefly to finish it off.
- I prefer to use either butter or extra virgin olive oil so that your cooking fat is at least adding to the flavor
- If you are cooking for a number of people don’t over crowd the pan as this will end up in the fish “stewing” rather than frying beautifully, so either cook in separate pans or in batches

Plating:
Pete explained that you can serve these dishes in a number of ways. Serving the vegetables at room temperature with the hot fish, gives you some contrast in terms of temperatures, which is what he went for here.
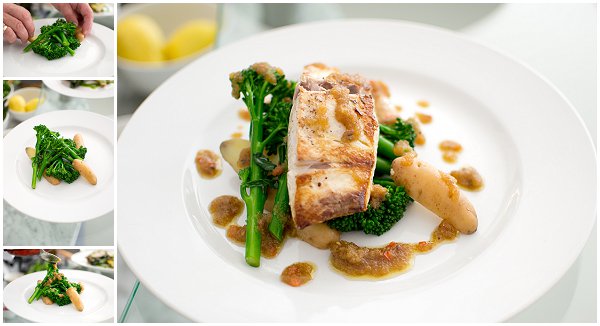
Yellowtail with Broccoli and Fingerling Potatoes, served with a Chilli and Anchovy Dressing.
Alternatively, you can sauté the vegetables in a pan for a bit, which would add to their flavour, and also add some crunch to the texture.
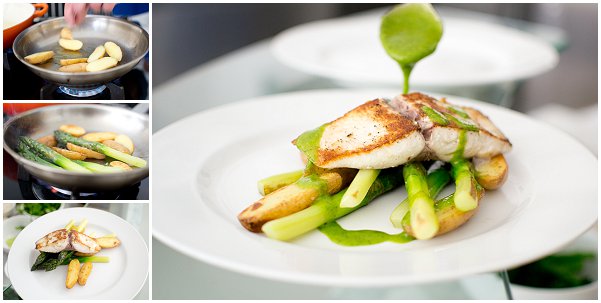
Yellowtail with Asparagus and Fingerling Potatoes, served with a Roasted Garlic and Parsley dressing
I of course had the pleasure of eating both these dishes with Pete afterwards, with a cold beer as reward for all “our” hard work. It’s always great to see what can be done with a few simple ingredients, if you know how to get the best out of them and treat them with respect.
I’d like to thank Pete from the bottom of my heart for sharing his time and expertise with me. It was an absolute joy to spend a few hours with him, watching and learning from a man who clearly knows a thing or two when it comes to food.
I hope you lot paid attention and have picked up a few tricks you can use in your own cooking at home, please let me know how it goes!


What an utterly superb posting this is. Well done Fritz. Bests, Michael
Thank you so much Michael, much appreciated :)
Fritz this is such a superb post. Your pics are stunning.
Thanks so much Sammykins, Pete was so awesome to work with, such a cool dude :)
Looks and sounds delicious, can’t wait to try!!
Thank-you!
Hey bud, was due…. I love the one with broccoli and anchovy dressing!!
Ciao Roberto! Yea it was WAY overdue, but I got there :) The Broccoli and Anchovy was really good together yes. I will make a plan to visit you guys again soon :)